
Brined & cooked recipeCuresmith Ratio
Pickled Ox Tongue
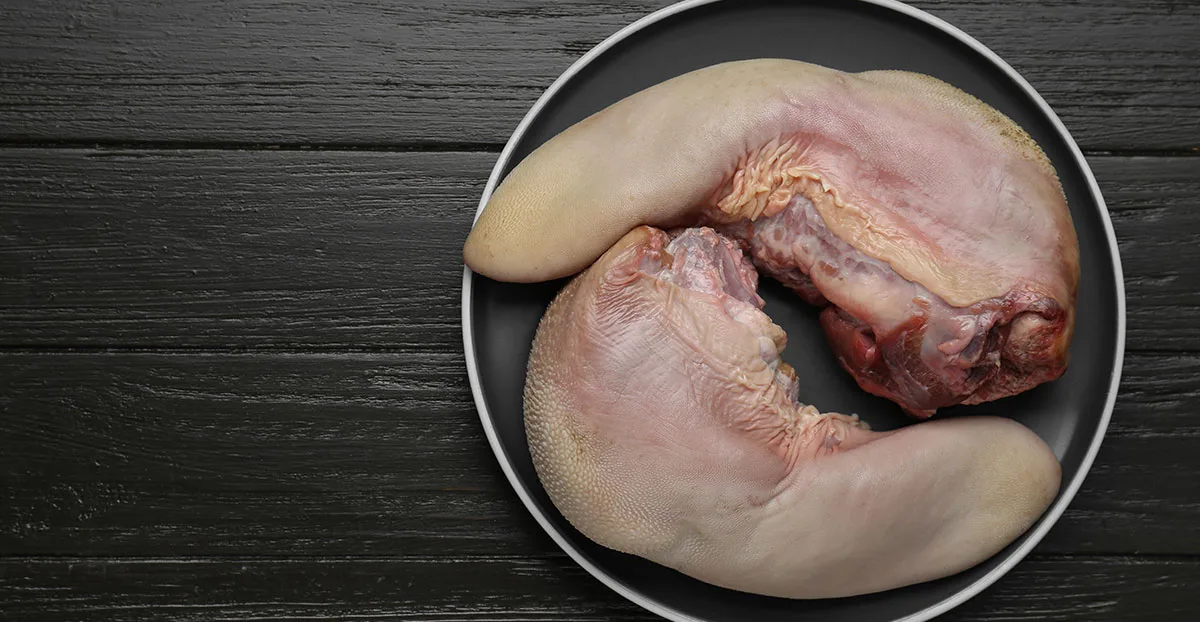
Pickled ox tongue is one of those traditional dishes that rewards patience and delivers flavour in every form. This pickled ox tongue recipe begins with the tongue being pickled properly, then slow cooked until it is tender enough to almost fall apart. The result is rich, savoury, and deeply satisfying, a cut that becomes far more delicate and flavourful than many people expect when it is treated with the care it deserves.
Introduction
For me, this pickled ox tongue recipe is a family favourite. Served hot, it is one of those proper meals that feels both generous and comforting. The tongue is cooked until beautifully tender and then brought to the table with boiled potatoes and dill, steamed carrots, and peas, with mustard or horseradish on the side. It is a dish with real substance, full of old-fashioned character and the kind of flavour that comes from taking your time.
What makes this pickled ox tongue recipe even better is that the leftovers are never around for long. Once chilled, the tongue slices beautifully, and cold slices disappear quickly in our house. Everyone wants them laid onto fresh sourdough bread, properly slathered with butter, and perhaps with a crisp piece of lettuce for a little freshness. In many ways, that second life is part of what makes ox tongue so special, it is just as good cold as it is hot, and sometimes even more eagerly fought over.
This pickled ox tongue recipe is built around exactly that appeal. It respects the traditional method of pickling and slow cooking, while celebrating the fact that this humble cut can become something truly memorable. Served hot as a full meal or sliced cold for sandwiches, it is one of the great examples of how traditional curing and careful cooking can turn an underrated cut into a real favourite.
Where it comes from
Before you begin
Purpose and scope
The recipes published on The Curesmith are intended for educational and informational purposes only. Meat curing, fermentation and smoking involve processes that, if carried out incorrectly, can result in products that are unsafe to eat. By using any recipe on this website you acknowledge that you do so entirely at your own risk, and you agree that The Curesmith and its authors cannot be held liable for any outcome arising from its use.
Limitation of liability
The Curesmith and its authors accept no responsibility or liability for any illness, injury, loss or damage arising from the use of these recipes, including but not limited to illness caused by improperly cured, handled or cooked meat products, errors in measurement or technique, equipment failure, or deviation from the stated method or quantities.
Nitrite and cure safety
Meat curing involves the use of nitrite salts, which must be measured accurately and used strictly according to the quantities specified. Nitrite in excessive quantities is toxic. Please ensure you understand the following before proceeding:
- Always use a calibrated digital scale accurate to at least one gram. For smaller batches, a scale accurate to 0.1g is strongly recommended.
- Never exceed the stated cure amounts. Never substitute cure types without recalculating.
- Store all curing salts clearly labelled, separately from regular salt, and out of reach of children.
- Different cure products have different nitrite concentrations. Always check your manufacturer's label and adjust quantities accordingly.
Food hygiene and cross-contamination
Raw and cured meat products must be stored, handled and prepared in a clean environment using food-safe equipment. Hands, surfaces, tools and containers must be thoroughly cleaned and where appropriate sanitised before use. Cross-contamination between raw meat and ready-to-eat products must be avoided at all times.
Temperature control
Temperature control is critical throughout all curing and smoking processes. Inadequate temperature management can allow the growth of dangerous pathogens including Clostridium botulinum, Listeria monocytogenes, Salmonella and E. coli. A reliable refrigerator thermometer and a calibrated probe thermometer are essential pieces of equipment for anyone producing cured or smoked meat at home.
Uncooked cured products
Whole muscle products that are eaten without cooking, such as air-dried bresaola, coppa or prosciutto, must reach their target weight loss before consumption. Products that have not been cured and dried to the correct specification may not be safe to eat uncooked. Pancetta and guanciale cured to less than 38% weight loss must not be consumed uncooked.
Bacon and other uncooked cured products
Bacon and other uncooked cured products must be cooked thoroughly before eating. Cold smoking adds flavour and colour but does not cook the product. A cold-smoked bacon or sausage remains a raw product and must reach a safe internal temperature before it is safe to consume. For pork and beef this is 72°C / 162°F. For poultry this is 74°C / 165°F.
When in doubt, seek professional guidance
If you are unsure about any aspect of the curing, smoking or fermentation process, we strongly encourage you to seek formal training or guidance from a qualified food safety professional before proceeding. The information on this website is not a substitute for proper food safety education and training.
Commercial production
These recipes are produced for home and small-scale producers. They are not intended for commercial food production. Commercial meat processing is subject to regulatory requirements that vary by country and jurisdiction. If you intend to produce cured or smoked products for sale, you must ensure full compliance with all applicable food safety regulations in your region.
The recipe
New to curing, or want step-by-step guidance?
The Recipe Wizard walks you through this recipe one step at a time, with explanations at every stage.
Ingredients
scale the recipe
| Meat & water | ||
| Ox tongue | Reference | 1500 g |
| Water | 1.29x meat | 1930 g |
| Water is calculated at 1.29x the meat weight. Use a non-reactive container that holds the meat with all the liquid covering it. | ||
| Cure & salt | ||
| Salt | 2.25% of total | 75 g |
| No nitrite used. The product will be grey-brown rather than pink, which is safe and traditional. | ||
| Sugar | ||
| Caster sugar | 0.75% of total | 25 g |
| Aromatics | ||
| Garlic, peeled | whole | 3 cloves |
| The brine spice blend is a fixed per-tongue amount. It does not scale with the tongue weight; for more than one tongue, multiply the aromatics manually. | ||
| Whole cloves | whole | 2 cloves |
| Bay leaves | whole | 5 leaves |
| Black peppercorns | whole | 20 peppercorns |
| Mustard seed (toasted) | ground | 5.0 g |
| Toast the mustard and coriander seeds together in a dry pan over medium heat for 1 to 2 minutes until aromatic and slightly darker, then tip onto a plate to stop the cooking. | ||
| Allspice berries | ground | 5.0 g |
| Mace, ground | ground | 2.0 g |
| Cinnamon stick (small) | whole | 1 stick |
| Coriander seed (toasted) | ground | 5.0 g |
Nitrite safety check
Brine timeline
Method
Recipe by The Curesmith — thecuresmith.com
Pickled Ox Tongue — Step-by-step Wizard
Your guided companion to curing, one step at a time.